|
|
|||
| Product Design | My Artwork | Living Sustainably | |
| Art Engineering | Levitation Kit | Solar Power | Chevy Volt |
| About Me | Blog | Solar Heating | Thermal Windows |
| Contact | Solar Hot Water | Solar Mower | |
Guy Marsden
SUSTAINABLE
LIVING
Insulating Windows
|
|
|||
| Product Design | My Artwork | Living Sustainably | |
| Art Engineering | Levitation Kit | Solar Power | Chevy Volt |
| About Me | Blog | Solar Heating | Thermal Windows |
| Contact | Solar Hot Water | Solar Mower | |
Guy Marsden
SUSTAINABLE
LIVING
Insulating Windows
.JPG) 3 window panels installed |
|
|
On December 19, 2007 I
ordered 9 double pane thermal window panels from
Advanced Energy Panels
in Hoosick Falls, New York. Their web site has work sheets that
you download and fill in with all the details of your windows. I
measured very carefully and faxed in the forms. Their prices are
changing as the cost of materials rises so by the time you read this the
cost per square foot will likely be over $9.00. You can
also
order kits and make your own panels. In July 1008 I came up with a way to make these panels at home for about $1.00/sq. ft., click here to see the details. They take about an hour each to build and are just as good as the commercial ones. The following afternoon I called in to confirm the order as no-one had called back to confirm receipt of the fax. I get the impression that these folks are under staffed and over worked in the winter. My order came to a little over $1200, and I was told to expect delivery in 6 weeks. December had already been one of the coldest months on record here in Maine and I had hoped to install them sooner. 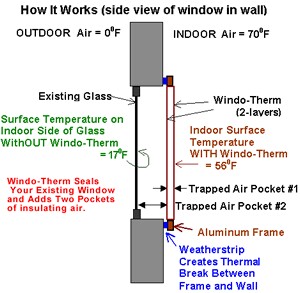 The panels form an air tight seal around each window and provide an
additional double pane air barrier.
While our high quality wood framed, double pane, low E,
Marvin windows
aren't drafty, there is a lot of heat loss by conduction which is why I
installed these panels. The panels will nearly double the insulation factor of
our windows from U.31 to .18, adding about R2.3 to each window. A lot of south facing window area
is a pre-requisite for energy efficient passive heating in the winter,
and these panels will make the heat gain more effective and save us a
lot on propane costs which are on the rise. We expect to see a
significant savings this year. The panels form an air tight seal around each window and provide an
additional double pane air barrier.
While our high quality wood framed, double pane, low E,
Marvin windows
aren't drafty, there is a lot of heat loss by conduction which is why I
installed these panels. The panels will nearly double the insulation factor of
our windows from U.31 to .18, adding about R2.3 to each window. A lot of south facing window area
is a pre-requisite for energy efficient passive heating in the winter,
and these panels will make the heat gain more effective and save us a
lot on propane costs which are on the rise. We expect to see a
significant savings this year.The panels arrived on February 1, 2008 - about when they had predicted. 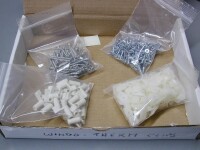 The
packing was very impressive, the 3 layered cardboard box was over 5ft by
4ft and 8" thick. There was a 4" hole punched right through one
part
of the box - probably by an errant fork lift, but fortunately it missed
the panels. The panels were shrink wrapped together in matching
sizes and separated by cardboard sheets - there must have been 40 lbs of
cardboard! There was also a box of hardware with a very generous
amount of screws and clips. The
packing was very impressive, the 3 layered cardboard box was over 5ft by
4ft and 8" thick. There was a 4" hole punched right through one
part
of the box - probably by an errant fork lift, but fortunately it missed
the panels. The panels were shrink wrapped together in matching
sizes and separated by cardboard sheets - there must have been 40 lbs of
cardboard! There was also a box of hardware with a very generous
amount of screws and clips.I have cut the cardboard box and packing into sheets and I will re-use this useful material for making templates and mockups and will recycle the rest. Cut into small strips, cardboard is also very good kindling that we use in our wood stoves. Unfortunately due to some communication errors my panels arrived with no weather strip on the right sides, and no pull tabs. (Pull tabs are needed to remove the panels from an inside fit - because you have nothing to grab onto). I called in and explained what was missing and they sent me 5 rolls of foam and a set of tabs, which arrived a few days later. |
|
  |
|
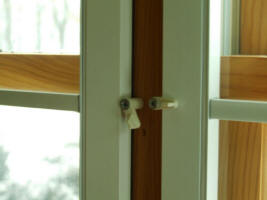
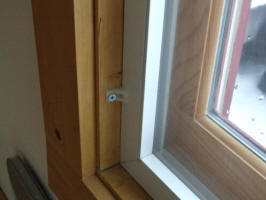
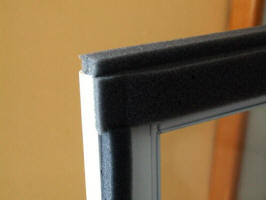
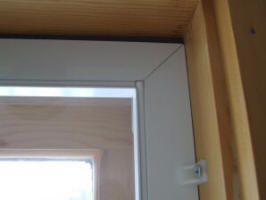
| Installation simply requires screwing clips into the window frames. For surface mount panels the clips rotate to allow removing the panel, but recessed panels require a clip that is screwed to the window frame, and the screw must be removed when you want to remove the panel. | |
  |
|
|
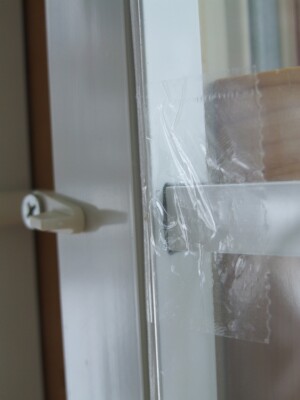
The clips compress foam weather strips around the edges of the
panel to form an air tight barrier that seals drafts. Typically a foam strip would be located on the bottom edge of each panel where it hits the widow sill, but some of my windows did not have a framed edge at the top, so I added foam along that edge too. |
|
  |
|
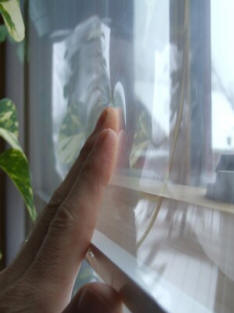
| The panels have 2 layers of heat shrink polyolefin film that are clear as glass and can be cleaned with regular window cleaner. The film is very flexible and can withstand anything but sharp objects. The AEP web site claims that it will repel baseball at 60MPH with only a 4" deflection! Just don't poke it with a knife. However repairs are simple with clear packing tape, and I did repair some very minor shipping damage that way. | |
 .JPG) |
|
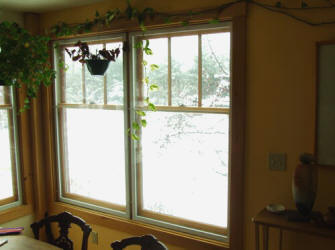
| Already we notice that we don't feel a chill when sitting near the window, and the heater seems to be running less often. The panels are not visually intrusive and are actually quite attractive. We do notice that they are not perfectly clear - there is a slight haze but it is not obnoxious, and most importantly we still have plenty of solar gain on sunny days. | |
I did a thermal imaging survey of our house and it clearly shows
the improvement when these panels are installed. Click the images
to see the survey in detail. The ground floor has the window
panels installed - except for the right one, while the upstairs windows
have pleated window shades installed and the right one is open.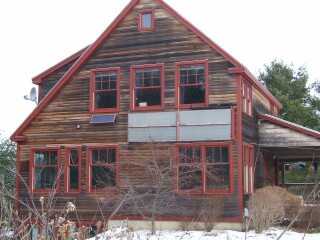 .jpg) |
|
Back to main Sustainable Living page