|
|
|||
| Product Design | My Artwork | Living Sustainably | |
| Art Engineering | Levitation Kit | Solar Power | Chevy Volt |
| About Me | Blog | Solar Heating | Thermal Windows |
| Contact | Solar Hot Water | Solar Mower | |
|
|
|||
| Product Design | My Artwork | Living Sustainably | |
| Art Engineering | Levitation Kit | Solar Power | Chevy Volt |
| About Me | Blog | Solar Heating | Thermal Windows |
| Contact | Solar Hot Water | Solar Mower | |
home > solar DHW
Installing My Solar
Domestic Hot Water
Heating System
|
Click below to jump to
specific pages
|
|||||||||||||
| HOME |
Receiving parts |
Design tweaks |
Installing staging |
Installing collectors |
Planning plumbing |
Pulling umbilical |
Plumbing tank |
Installing Wand |
Test Results |
Dash board |
Check valve |
Adding HX |
LIVE STATS |
|
|
|
|
|
|
|
|
|
|
|
|
|
|
|
Day 7 - planning plumbing
| Jul 22, 2006. Time Invested today: 0:35 Walking through the job and considering options 0:45 Researching electric water heaters 2:00 Buying the wrong heater, going back and getting the right one |

My wife approved this concept, so long as I box in the plumbing in wood to match the window frames. A simple job for me as an experienced woodcrafter. |
 Down in the basement the hole penetrates behind a joist above the electrical panel. By opening up the gap above the drywall a bit we can pull the umbilical up without too much trouble. Then the umbilical can be attached to the joists along the exposed ceiling about 12 feet to the water heater closet. We decided not to try running holes through the joists for the umbilical, since it would stress the copper pipe too much and probably damage the insulation too much to pull it through all those holes. It can be strapped up with U brackets, and boxed in if we ever finish the ceiling in the basement. |
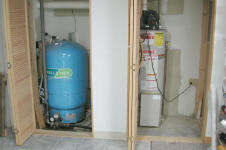 Looking at the location of the 40 gallon water heater John observed that it looked small. It suddenly occurred to me that it might be much more efficient to install another 40 gallon tank (electric water heater) to the right of the propane heater and use the Solar Wand to pre-heat cold water entering this tank that would then feed the water heater. The higher Delta-T between the cold water and the collector would dramatically improve the Wand's efficiency! A new tank would only cost about $200 or so and be very simple to install. I emailed Barry Butler asking his thoughts on this idea. I took a drive down to Lowe's and Sears to look at water heaters. I learned that 40 gallon units do sell for just under $200, and Lowe's also have a 50 gal. unit for about $250, both are 20" wide which will just fit in the closet. I have emailed Barry Butler at Butler Sun Solutions to see if he concurs with this plan before I go and buy a tank. It sure would simplify the plumbing layout and make for a neat system. John also observed that I was lucky to have my (blue) well pressure tank in my heated basement where it pre-heats the incoming water somewhat. This had never occurred to me before, apparently many such tanks here in Maine are in the unheated basement where temperatures approach freezing in the winter. |
|
CHANGE OF PLAN! |
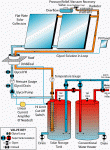 Barry emailed me back and agreed that the extra tank will be a good idea. He sent me a new diagram (at left) and reminded me that the tempering valve will be on the existing hot water heater to prevent scalding. So I'm off to Lowe's today to pick up a 50 gallon tank. It will be much easier to pre-install the wand and all plumbing before sliding the tank into place in the closet. Then I can just re-plumb the feed lines once it is in place. This will make for a very neat installation. |
 Update:
June 2010 Update:
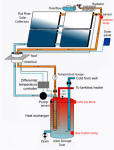
June 2010The original propane water heater sprang a leak and we replaced it with a propane fired heat on demand water heater. This reduces the stand-by losses of a tank, where heat is being constantly lost through the walls. Click here to learn more about the tankless heater installation. At left is a revised system layout that does not show the tankless heater, but does include the Solar Differential Temperature Control that I manufacture. Red dots show the location of temperature sensors that record the live statistics for the last page of this blog. |
  When
I returned from Lowe's with the 50 gallon tank that I found for $209.00 I
immediately opened up the box to check the outlet port to be sure that it
would fit the Solar Wand. Oops! It has a male thread (see
left). Back to Lowe's again to find a tank with a female opening.
I took a short length of 3/4" copper pipe which has the same OD ad the
Wand so I could check the openings. I found a 40 Gallon
Whirlpool tank with only one heating element in it for $199.00. It
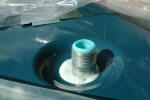
has 3/4" female connections, but it comes sealed with plugs (at right) that require a 1/2" ratchet
tool to remove. I'll have to borrow a tool from a neighbor to open
this up and see if the Wand will fit. When
I returned from Lowe's with the 50 gallon tank that I found for $209.00 I
immediately opened up the box to check the outlet port to be sure that it
would fit the Solar Wand. Oops! It has a male thread (see
left). Back to Lowe's again to find a tank with a female opening.
I took a short length of 3/4" copper pipe which has the same OD ad the
Wand so I could check the openings. I found a 40 Gallon
Whirlpool tank with only one heating element in it for $199.00. It
has 3/4" female connections, but it comes sealed with plugs (at right) that require a 1/2" ratchet
tool to remove. I'll have to borrow a tool from a neighbor to open
this up and see if the Wand will fit. |
 When I removed the plugs at the top of the tank, I still had the tank
in it's box, and did not notice the connection on the side. I also
noticed that this tank does not have a dip tube for the top cold inlet so
I called Whirlpool to ask about this. The helpful person explained
that this tank is designed for a mobile home and that the cold inlet
should be connected to the bottom inlet. This will make the plumbing
a bit more annoying, but I'm committed to this tank at this point. When I removed the plugs at the top of the tank, I still had the tank
in it's box, and did not notice the connection on the side. I also
noticed that this tank does not have a dip tube for the top cold inlet so
I called Whirlpool to ask about this. The helpful person explained
that this tank is designed for a mobile home and that the cold inlet
should be connected to the bottom inlet. This will make the plumbing
a bit more annoying, but I'm committed to this tank at this point. |
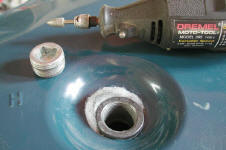 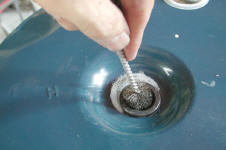 When I opened up the box in my workshop I found that the
Wand would not
fit past the indented ring right below the threads on the hot outlet.
In the Solar Wand Installation Instructions it is noted that some tanks
have this issue, and one can use a Dremel or round file to open up the
hole. I used a diamond coated cutter, and it only took a few
minutes. I vacuumed out the hole, and used a wire brush to clean out
any debris from the threads. When I opened up the box in my workshop I found that the
Wand would not
fit past the indented ring right below the threads on the hot outlet.
In the Solar Wand Installation Instructions it is noted that some tanks
have this issue, and one can use a Dremel or round file to open up the
hole. I used a diamond coated cutter, and it only took a few
minutes. I vacuumed out the hole, and used a wire brush to clean out
any debris from the threads. |
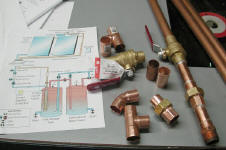 After studying Barry's revised layout, I set to work building up some
of the plumbing sub-assemblies. I had some parts laying around, and
will go to the hardware store to get other parts once I have planned out
all the plumbing. It will help to have the tank in place before I
finalize the plumbing layout After studying Barry's revised layout, I set to work building up some
of the plumbing sub-assemblies. I had some parts laying around, and
will go to the hardware store to get other parts once I have planned out
all the plumbing. It will help to have the tank in place before I
finalize the plumbing layout |
|
|