|
|
|||
| Product Design | My Artwork | Living Sustainably | |
| Art Engineering | Levitation Kit | Solar Power | Chevy Volt |
| About Me | Blog | Solar Heating | Thermal Windows |
| Contact | Solar Hot Water | Solar Mower | |
|
|
|||
| Product Design | My Artwork | Living Sustainably | |
| Art Engineering | Levitation Kit | Solar Power | Chevy Volt |
| About Me | Blog | Solar Heating | Thermal Windows |
| Contact | Solar Hot Water | Solar Mower | |
home > solar DHW
Installing My Solar
Domestic Hot Water
Heating System
|
Click below to jump to
specific pages
|
|||||||||||||
| HOME |
Receiving parts |
Design tweaks |
Installing staging |
Installing collectors |
Planning plumbing |
Pulling umbilical |
Plumbing tank |
Installing Wand |
Test Results |
Dash board |
Check valve |
Adding HX |
LIVE STATS |
|
|
|
|
|
|
|
|
|
|
|
|
|
|
|
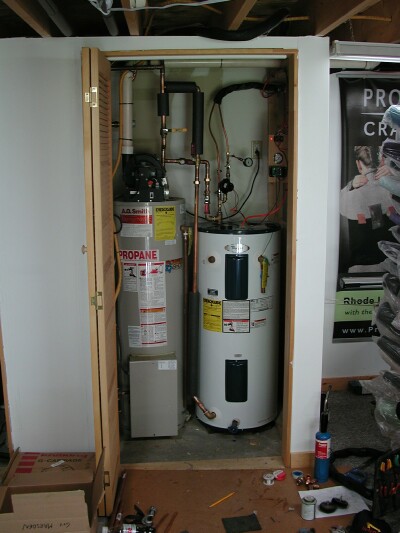
Day 10 - plumbing the Solar Wand
| August
1, 2006. Time Invested: 4:00 plumbing in the Solar Wand and installing wiring and control panel NOTE in 2010 we replaced the tank heater with a Rinnai tankless model |
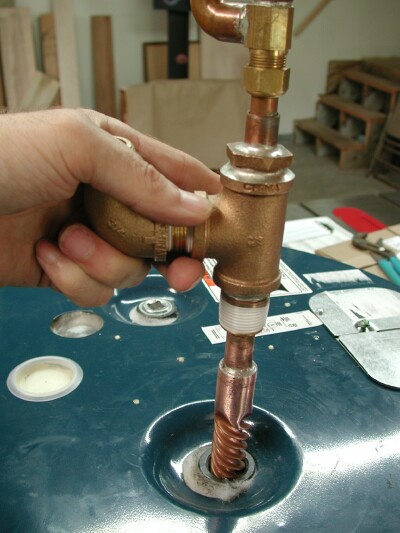 Here's
a shot of me test fitting the Solar Wand in my workshop a few days ago.
I had to whittle the hole out in the tank a bit more because the upper
section of the Wand had some thick places. I had been using just the
bottom end to check the hole size back when I was opening up the hole.
I'm glad I double checked since it is easier to ream out the hole in my
workshop than down in the basement. Here's
a shot of me test fitting the Solar Wand in my workshop a few days ago.
I had to whittle the hole out in the tank a bit more because the upper
section of the Wand had some thick places. I had been using just the
bottom end to check the hole size back when I was opening up the hole.
I'm glad I double checked since it is easier to ream out the hole in my
workshop than down in the basement. |
  I
made one small mistake when connecting the plumbing parts to the Wand.
I saw that I had 2 parts transposed after I had really tightened down
the swage fitting and deformed the ring. There was nothing for it
but to go back to the hardware store for a replacement part ($4.80). I
made one small mistake when connecting the plumbing parts to the Wand.
I saw that I had 2 parts transposed after I had really tightened down
the swage fitting and deformed the ring. There was nothing for it
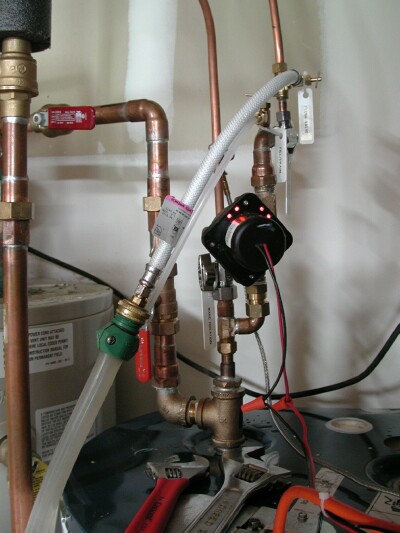
but to go back to the hardware store for a replacement part ($4.80).This part was pretty easy, and if I had not elected to install the pre-heat tank I think a "normal" installation would go very quickly. One must really pay attention to the details and plan out the assembly sequence so that all the parts are rotated so that they clear each other. I particularly wanted to be able to see the red lights on the El-Sid circulation pump. I know from experience that these pumps are so quiet that you need the lights to be able to tell they are running! It was relatively simple to finalize the umbilical connections. Per the instructions I had identified which tube was which and labeled them with arrows on each one. Cutting them to length and bending them into place was quite simple. One thing I was unclear about with all the swage fittings was how much to tighten them, so I erred on the loose side at first. |
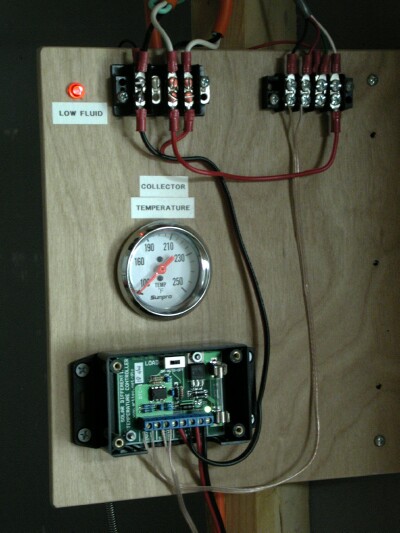 I
stopped to make a control panel from a scrap of 1/4" Cherry veneer plywood
I had laying around. I mounted this at a convenient angle to the
right of the tank. I mounted the provided terminal strip for the
signals and hooked up the red LED that indicates low fluid in the overflow
tank - it lit up from the power in the PV panel! Then I added my own
second terminal strip for the PV wire and mounted one of my own
solar powered Differential Temperature Controllers,
and connected the sensors and pump to it. I
stopped to make a control panel from a scrap of 1/4" Cherry veneer plywood
I had laying around. I mounted this at a convenient angle to the
right of the tank. I mounted the provided terminal strip for the
signals and hooked up the red LED that indicates low fluid in the overflow
tank - it lit up from the power in the PV panel! Then I added my own
second terminal strip for the PV wire and mounted one of my own
solar powered Differential Temperature Controllers,
and connected the sensors and pump to it. Finally I installed the provided temperature gauge. I admire the simplicity and cleverness of using a standard automobile gauge for this. They had even opened up the package it came in and taped a hose clamp to the end of the sensor to make it obvious that the sensor should be clamped to the tube coming from the collector. Very thoughtful! Note that the red light is on indicating a low reservoir level in the overflow tank above the collectors. This is because I have not yet filled the system with glycol anti-freeze mix, so the tank has only a little fluid in it. |
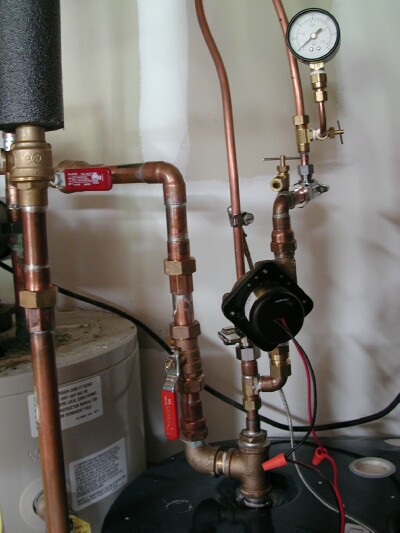
 Once
again the Installation Manual was quite clear about the filling process.
It begins by identifying and naming the 4 valves. I stopped to make
up little plastic tags that I tied onto each valve to identify them so I
would not get confused. It also makes it easier to follow the steps
in manual. Once
again the Installation Manual was quite clear about the filling process.
It begins by identifying and naming the 4 valves. I stopped to make
up little plastic tags that I tied onto each valve to identify them so I
would not get confused. It also makes it easier to follow the steps
in manual.There are 2 hoses provided with the kit. One that allows a garden hose to be used to fill and flush the collectors, and a fill drain hose that allows the water to exit the plumbing into a bucket. (This same hose is also used later to siphon anti-freeze mix into the system.) I connected the garden hose to the drain valve on the pre-heat tank and cautiously opened the valve. There were ominous hissing sounds and drips right away. I identified the loose fittings and tightened them down. After 2 more tries I had them all tight and drip free. Then I left the fill hose open and waited a minute or so for the collectors to fill and to see water come back out. Finally warm water! Another minute or so to purge all the crud from the system. Again, following the instructions carefully, I shut off the drain valve and let the house pressure push some water out of the radiator cap into the overflow tank above the collectors. I went up and opened my bedroom window to check for the presence of water in the tank and yes there it was! I noted that the little float sensor was just beginning to lift up in the water. Since it was late in the afternoon there was only glancing sun on the collectors so the water was only slightly warm, but there was enough PV power to run the pump. I was able to use the ON/AUTO/OFF switch on my differential temperature controller to operate the pump. |
|
|