|
PANEL INSTALLATION |
June 25
Re-roofing. The building is nearly 20 years old and the cheap
shingles are overdue for replacement. My roofer used "Landmark" architectural shingles
made by
Certainteed. I selected a lighter shade to reduce the heat
gain from the summer sun. Scott Paraskevakos
and his son did a great job, if you live in mid coast Maine and need a
roofer call him at:837-2760 |
June 26
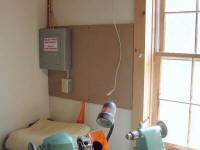 I
installed the load panel on the ground floor of my workshop at the
closest corner to where the 240V wires will drop down from the solar
panels on south west
corner of the roof. I ran 8/3 Romex cable back to the main
breaker where it ties in to a 30 Amp double breaker. In the load
panel I installed 2 15-Amp double breakers and pulled 12/3 wire up to
the 2nd floor in preparation for pulling it through to the roof to
weatherproof junction boxes. I
installed the load panel on the ground floor of my workshop at the
closest corner to where the 240V wires will drop down from the solar
panels on south west
corner of the roof. I ran 8/3 Romex cable back to the main
breaker where it ties in to a 30 Amp double breaker. In the load
panel I installed 2 15-Amp double breakers and pulled 12/3 wire up to
the 2nd floor in preparation for pulling it through to the roof to
weatherproof junction boxes.
I also installed an outlet on its own 15A breaker below the panel for the Enphase EMU unit
that I will mount next to the panel.
Then I ran a CAT-5 network cable from my web router in my office
upstairs down to near the panel. |
August 1
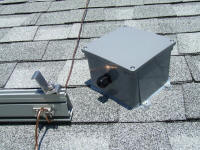 After
I got the rails mounted,
I climbed back up and installed the electrical junction boxes. I
drilled holes through the roof and fed the Romex out and through the
bottom center of each box via a Romex connector. Then I bedded the
box down in silicone and screwed it down, then beaded the edge with
silicone too. I mounted it diagonally to reduce the risk of ice
dams causing stress that could lead to leaks. I used a 6X6 box so
that I would have plenty of room for the 4 wire splice. After
I got the rails mounted,
I climbed back up and installed the electrical junction boxes. I
drilled holes through the roof and fed the Romex out and through the
bottom center of each box via a Romex connector. Then I bedded the
box down in silicone and screwed it down, then beaded the edge with
silicone too. I mounted it diagonally to reduce the risk of ice
dams causing stress that could lead to leaks. I used a 6X6 box so
that I would have plenty of room for the 4 wire splice. |
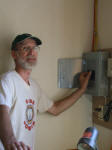
August 14
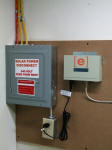 Yesterday
I picked up 12 inverters (waiting for 9 more) and the EMU. I
installed the EMU next to the disconnect breaker box and powered it up
and connected it to the web. After a while the display indicated
that it had connected to the web, so it is all ready for the inverters
and panels! Yesterday
I picked up 12 inverters (waiting for 9 more) and the EMU. I
installed the EMU next to the disconnect breaker box and powered it up
and connected it to the web. After a while the display indicated
that it had connected to the web, so it is all ready for the inverters
and panels!
Click here to learn about
the inverter installation. I had to wait over 2 months to get
these new inverters, and only got 12 of the 21 I needed, and had to find
a second source to get the remaining 9. They are very new and in
very high demand. |
August 28
We finally got a day of nice weather - not raining, too hot or too
humid. So I decided it was time to put up panels on the 12
inverters that I have installed, the remaining 9 inverters will arrive
next week. I called my friends Topher and Barbara, and neighbor
Charlie and his son Taylor, and also drafted our niece Gaia who was
visiting before starting her first semester of college in Boston.
We got them up in about 2.5 hours and had fun!
Thanks to Gaia and Barbara who stopped to take pictures during the
process! |
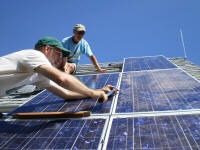
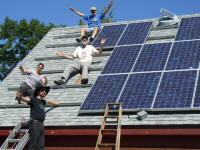
Before each panel went up
we taped a sheet of cardboard to it so that it would be covered when we
plugged it into the inverter. We made sure that 2 pairs of hands
were holding the panel at all times for safety. We started with
the lower right panel, and then added 2 above that, and moved left from
there. We took a lot of trouble to get that first panel square to
the rails and as they went up we had to constantly tweak them to get
them to line up. It helped to have the lower panels secured first
so they would support the ones above.
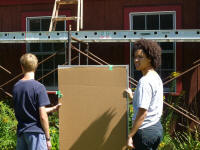 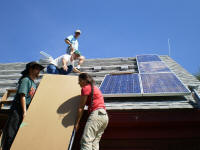 
L: Taylor and Gaia with a covered panel
mid: Topher and Barbara lift a panel up to Charlie and I
R: Charlie and I placing a panel as Topher and Gaia stand by |
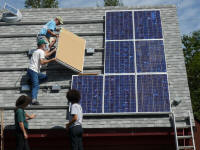
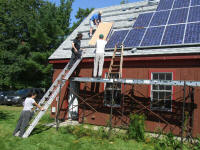
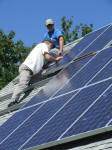
Here we are plugging the
solar panel into the inverter underneath it. It's important to
keep the panel covered when connecting it since the connections will
have live power if the panel is exposed to the sun. You don't want
to mess with over 150 Watts of DC power!
L: Charlie holds the panel while I plug it
in.
R: Installing the 7th panel. |
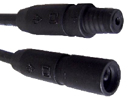 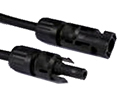 The
solar panels I bought came with MC3 style connectors (shown at left), so
I had to order microinverters with the right type of mating connectors.
These connectors are a soft rubber press-fit that can be separated
relatively easily. The MC4 style connectors (shown at right) are a
locking type that require a special plastic tool to separate.
Different panels come with one or the other as standard and it's
important to match connectors between the panel and inverter. The
solar panels I bought came with MC3 style connectors (shown at left), so
I had to order microinverters with the right type of mating connectors.
These connectors are a soft rubber press-fit that can be separated
relatively easily. The MC4 style connectors (shown at right) are a
locking type that require a special plastic tool to separate.
Different panels come with one or the other as standard and it's
important to match connectors between the panel and inverter.
|
 Throughout
the project Barbara managed all the hardware, and prepared a set of
parts for each panel as it went up. We only dropped one or 2
parts, and this system ensured that there would not be too many parts
lost if we dropped a whole container full. The WEEB washers are
$2.00 each and the stainless bolts, washers and nuts are quite expensive
too. Throughout
the project Barbara managed all the hardware, and prepared a set of
parts for each panel as it went up. We only dropped one or 2
parts, and this system ensured that there would not be too many parts
lost if we dropped a whole container full. The WEEB washers are
$2.00 each and the stainless bolts, washers and nuts are quite expensive
too. |
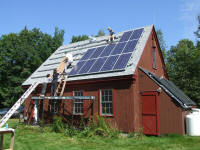
 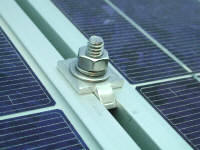 Then
we secured the panels with the stainless steel bolts and hardware.
WEEB washers under the panels connect them to the grounded rails and
need to be torqued down at 15 foot pounds. The screws that
protrude from each end of the panels (at top and bottom) make it
difficult to set one panel directly above the other so I made a wood jig to keep the separation at 1/4". It
is a piece of 1/4" masonite with strips of wood on both sides to hold it up on the panels.
We had some trouble maintaining a consistent vertical gap, and had to go
back and adjust the panels a few times. Then
we secured the panels with the stainless steel bolts and hardware.
WEEB washers under the panels connect them to the grounded rails and
need to be torqued down at 15 foot pounds. The screws that
protrude from each end of the panels (at top and bottom) make it
difficult to set one panel directly above the other so I made a wood jig to keep the separation at 1/4". It
is a piece of 1/4" masonite with strips of wood on both sides to hold it up on the panels.
We had some trouble maintaining a consistent vertical gap, and had to go
back and adjust the panels a few times.
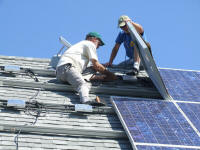
Charlie (top) and I were the "roof monkeys" on the job. |
Some more shots of the
installation: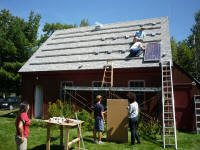

|
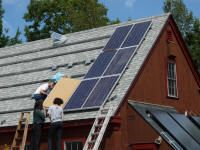
| After they were all up,
Topher walked over the electric meter to watch as I flipped on the
circuit breaker in the disconnect box. "It slowed down a lot!" he
exclaimed. I set the Enphase
Energy Management Unit (EMU)
to scan for the inverters, and a few hours later it logged them all and
showed that it had recorded a total of 3.1kW for the day. (See the
REAL-TIME STATS page for more info).
A nice start for only a few hours of afternoon sun, I'm happy already.
The panels shut down around 7:30pm as they dropped below 5 Watt total
output from a max of over 1560 Watts. |
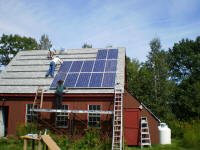
September 4, 2009
Yesterday the final 9 inverters arrived and I
installed them.
Today my neighbor Charlie and friends Topher and Barbara helped me to install the
final 9 solar panels. It was a blistering, clear, windless day in
the 90's ad we were sweating a lot. |
Thanks to
Rebekah
Younger for the photos below
   |
At last
we're done!
 I
went inside and turned on both circuit breakers. I
went inside and turned on both circuit breakers.
I set the Envoy to scan for new modules
and after a rest break for ice cream and fresh picked blueberries we
came back and logged into the
Envoy EMU from
the LAN. We saw that all the inverters had been identified and
that the system was generating over 2300 Watts! I emailed Enphase
tech support to ask them to update the panel layout on my Enlighten
account. |


.jpg)


