INSTALLING INVERTERS |
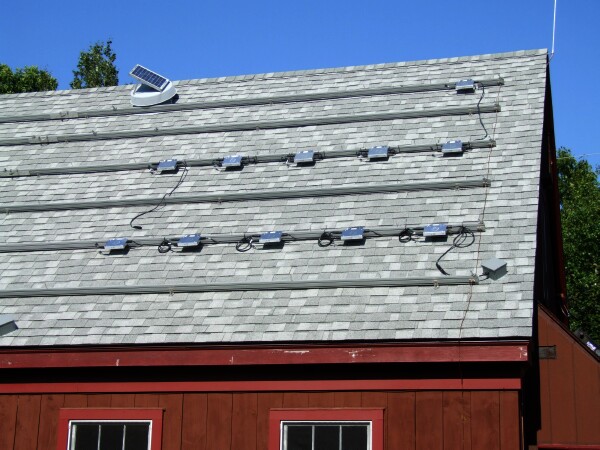 |
August 14, 2009
I decided not to wait for the remaining inverters and
start by installing the 12 (of 21) that I have so far. These are
the brand new
Enphase M190 units
(now discontinued) that were in high demand and short
supply. This installation is not going the way that I visualized
it -- I had pictured a barn raising with half a dozen friends taking a
day or so and we'd have the whole thing done. Instead I'm doing it
piecemeal while I wait for the inverters to arrive. |
 I
began at the bottom right and wired the cable end into the junction box
and then mounted the first inverter at the bottom right of the roof.
I had planned to run the AC circuit up 3, left 1, down 3, and on to the
left for 15 units. I
began at the bottom right and wired the cable end into the junction box
and then mounted the first inverter at the bottom right of the roof.
I had planned to run the AC circuit up 3, left 1, down 3, and on to the
left for 15 units.
Each inverter's 240 Volt AC cable plugs into the next unit like
extension cords in series. The maximum number of inverters per
group is limited by the 15 Amp circuit breaker, in this case my limit is
16 units and I'm installing 15 in the first group, and the remaining 6
in a second group. Eventually I will add to the 2nd group as
finances allow. But when I installed the second inverter above the
first I found that the AC cable built into the unit was not long
enough! Whoa!
So I called
Enphase tech support and spoke with Eric. I asked him
to look at my blog so he could see my layout and understand the issue.
He immediately offered to send me some 6ft. extension cables for free!
So I asked for 4 of them. If I change the wiring sequence to start
at bottom right, go left 5, then up 1, then right 5, then up 1 then left
5 -- then I only need to go up twice per group of inverters. The
second group will have 6 inverters to begin with and eventually 14 total
as I can afford to add to the system.
The previous model M175 had AC cables with
male and female ends, the M190 has a male cable and a female connector
built into the unit. I think the 2 cable design was better as it
allowed more flexibility in installation.
Sept. 9, 2009. An Enphase staffer told
me today that the cables have been extended 8" on all production units |
Here is a
system wiring diagram:
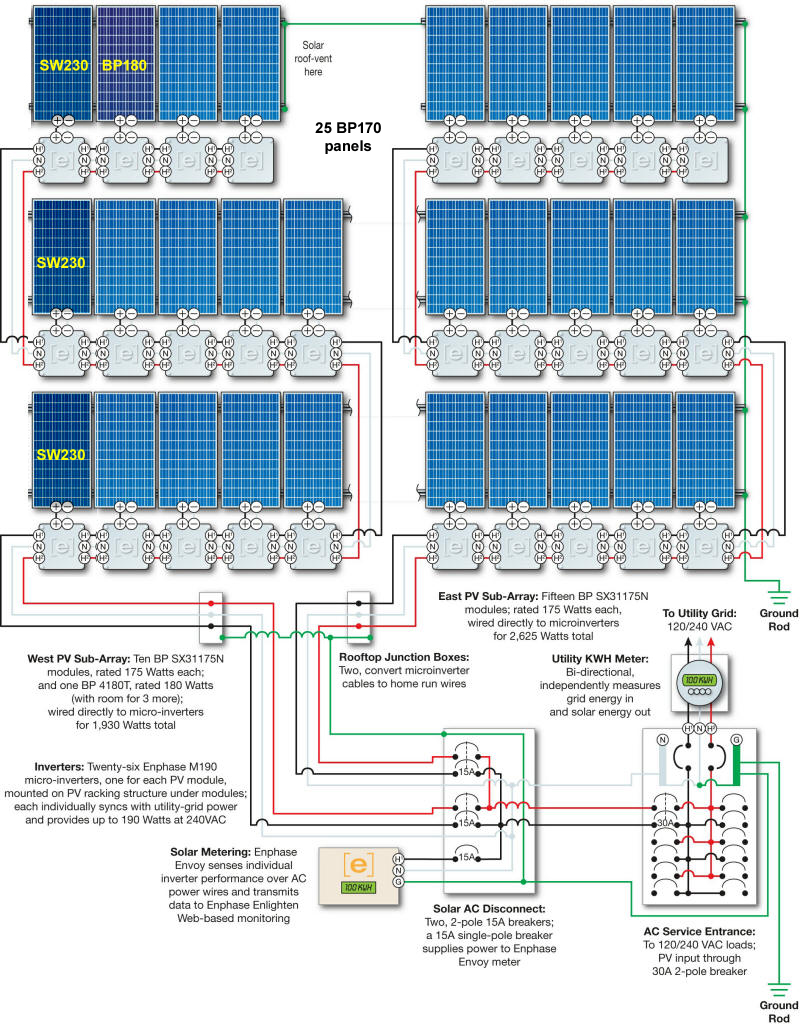
|
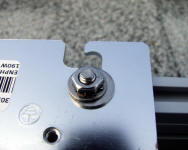 I am mounting the inverters with an extra large washer, regular washer,
lock washer and nut over the right mounting slot. The large washer is there to
cover the WEEB grounding washer to ensure it gets good even pressure on
it. I used a
torque wrench to tighten the nuts per the
Wiley Electronics
recommendations. I am mounting the inverters with an extra large washer, regular washer,
lock washer and nut over the right mounting slot. The large washer is there to
cover the WEEB grounding washer to ensure it gets good even pressure on
it. I used a
torque wrench to tighten the nuts per the
Wiley Electronics
recommendations.
Since I did not originally have a torque wrench, I looked for an
inexpensive one on the web and found one for about $15.00 at
Harbor Freight Tools.

While they are known for cheap tools that are often not much good, this
tool has worked out fine on the job. I have found many great
bargains at Harbor Freight.
Update April 14, 2010
Enphase has released an app note clarifying how to use the WEEB grounding system
for their inverters.
Download
it here. |
September 3, 2009
I finally got the last 9 inverters. I had to scour the web to find
a supplier that had some in stock - they are selling out fast. So
I went up on the roof and installed them today in preparation for
installing the remaining panels tomorrow.
|
  Here
are some images that show the WEEB grounding washer that I put beneath
the
Enphase inverter bracket to ground it to the Genesys mounting
rail. Here
are some images that show the WEEB grounding washer that I put beneath
the
Enphase inverter bracket to ground it to the Genesys mounting
rail.
|
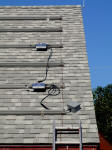
  Here
I am torquing down the inverter mounts and plugging the inverter in to
the extension cable that goes down to the next row. It's a
"plug-n-play" system! (Note that I had turned off the circuit
breaker before working on the roof!) Here
I am torquing down the inverter mounts and plugging the inverter in to
the extension cable that goes down to the next row. It's a
"plug-n-play" system! (Note that I had turned off the circuit
breaker before working on the roof!)
Thanks to my wife,
Rebekah
Younger for these photos |
 The
daisy chain wiring of the inverters terminates to a cable that comes
from a weatherproof junction box. I used a larger than necessary
box to have plenty of room inside - could have used a smaller 4X4 box in
retrospect, but they are cheap. Note the weatherproof wire
connection on the side of the box. The
daisy chain wiring of the inverters terminates to a cable that comes
from a weatherproof junction box. I used a larger than necessary
box to have plenty of room inside - could have used a smaller 4X4 box in
retrospect, but they are cheap. Note the weatherproof wire
connection on the side of the box. |
Tomorrow, we'll install the solar panels to complete the 21 panel array.
Here are 2 really good videos that detail the installation of a system
in New Jersey. Very clear and detailed:
Part 1 New Jersey PV Solar Installation of a Enphase Energy Micro Inverter
system
Part 2 New Jersey 5.6 KW PV Solar Installation of a Enphase Micro Inverter
system
|
 |
|
If you found the information presented on my web site to be helpful you
can send me a donation to show your appreciation for the many hours I
have invested in presenting my knowledge and experience. This is
NOT tax deductible and will show as a consulting fee on your receipt.
|


.jpg)


